Friday, September 2, 2016

Lady Feather Has Arrived

My feet are swollen with the heat and sitting for hours on end in one place stitching for nearly a week straight and I am bone tired but the lady is done and has been entered into a show - two days before deadline even. She certainly was a high maintenance kind of girl!

In this shot I had laid different components on top of what was stitched down so I could get an idea of how she was coming out and how the colors were "playing" together. It was at this point that I discovered that I had no pink dogwood fabric. Carol Eaton came to my rescue with a perfect piece of fabric which she mailed out to me. The sky fabric is hers as well, so a good chunk of this piece has a bit of Carol in it.

Continuing from my first two posts about the "Lady", I found that creating this piece was way more full of layering than any other quilt I have done to date.


Simple components like the birds were easier. I fused them onto muslin together and popped them onto the quilt. Soon they were ready to be quilted. 


The flowers went on pretty easily as well. Each flower was fused to muslin first and then over the quilt to mask the stitching underneath for the sky. However the tiny bits of white at the tip of each dogwood flower were sewn separately and each thread had to be tied off and buried in the back. If I had a nickel for every time I buried cut thread, I'd be rich!


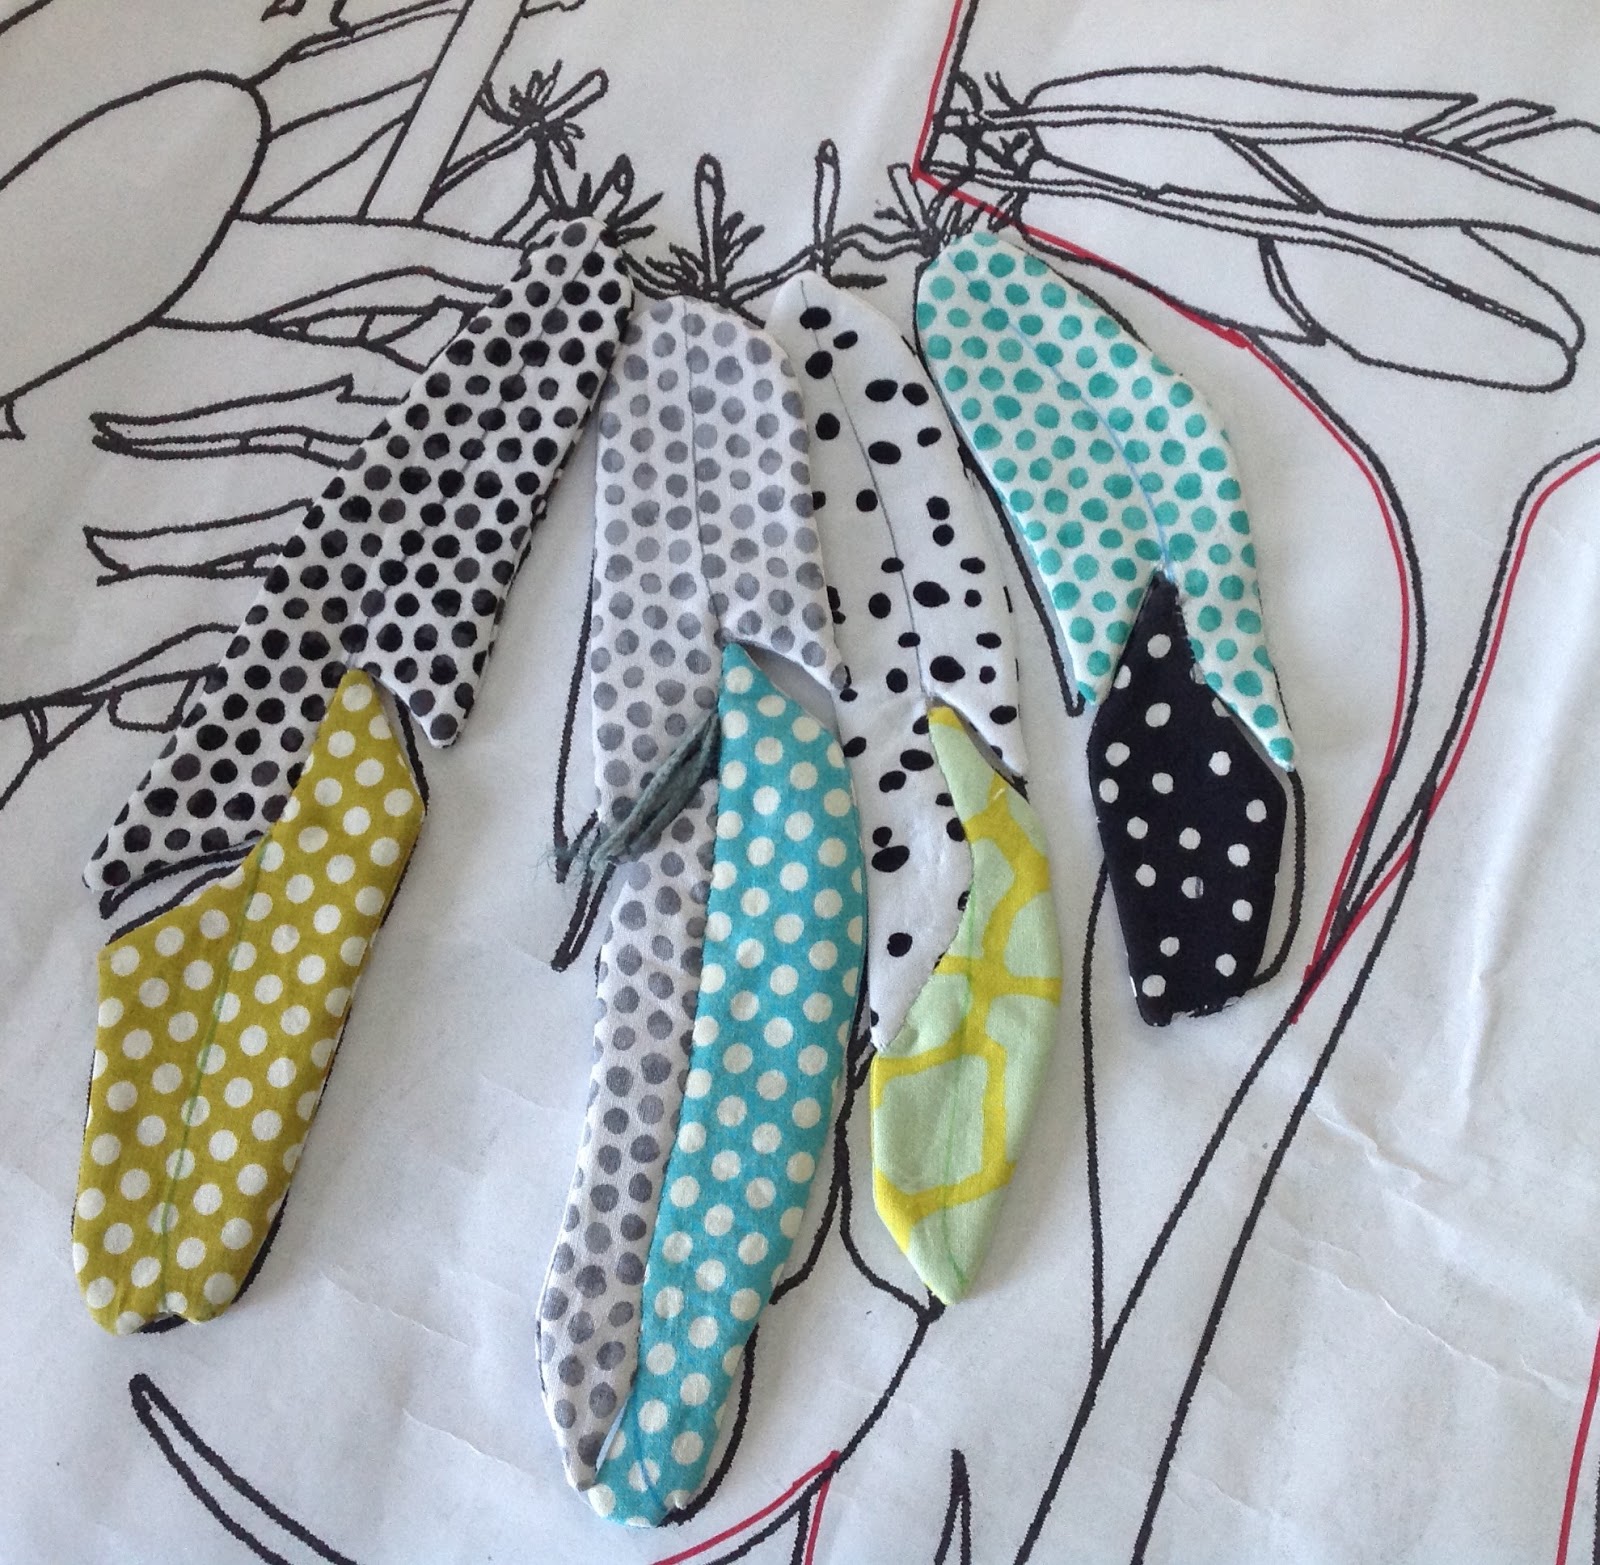
What really took time and brainpower was layering the feather quiltlets, her right arm, the Mourning Dove, her blond locks, and the handle for the mask. They all converged into one area. I ended up adding padding between areas like the feathers so that the fingers, which were on top, were stitched on an even surface. It became like a game of puzzles that I had to solve.

But it did get finished in time to have it photographed. And to enter it two days early for a call. Which call? Quilt National '17.


My detail shot (yes those are real feathers sewn on her mask)...
and here is the reveal...


LADY FEATHER
43" x 42"
Completed August, 2016
$2,800.00
Commercial and Hand-dyed cotton, silk and organza; fused, discharged and machine stitched with leather cord and feathers as embellishment


OK, so let's talk about the elephant in the room. This is my first time entering Quilt National. It has been my number 1 goal to get accepted into QN since I first saw a QN catalog back in the 1990's, twenty years ago. I feel that only now, after years of practice and building a reasonable body of work, am I ready to try. But the reality is that countless artists submit many times before getting accepted (if at all), which in a biennial show means double the years of waiting. I am staring straight down the barrel of a loaded shotgun that's aimed directly at my heart. I am expecting that it will go off and I will have to deal with rejection. 

My good friend Sue Bleiweiss just wrote an article for her blog on rejection and how necessary it is towards fueling the hard work we need to create growth and expertise. Her thoughts are right on the money! My first five entries into exhibits ever were met with acceptance, which is down-right unusual. Then I got a bucket full of rejections and I feel that I am somewhat numbed to the sting at this point. I have been twice rejected from Visions. But honestly, you can't let it get you down and you have to just keep trying harder.

So, come the first week of October we all will know who did get into Quilt National. No matter what the outcome, I will be submitting a piece every time the QN call comes up from now on. I'm already thinking about 2019!

onward...

I have another deadline approaching. I have mentioned Apollo in previous posts. I have just begun to really get into it. I am working the background areas like a landscape and adding foreground wildflowers layered on top. Lastly will come the Alpine Apollo butterflies which are sipping from the nectar of thistles. If Lady Feather nearly killed me, Apollo surely will finish me off! I will be posting as it gets going into full blast. 

To get into the mood, I visited a butterfly garden in Westford, MA with a friend this past Monday. It was just amazing, they were everywhere! Here are some photos I took.


And not that long ago in the beginning of August...

SAQA MA/RI had a call for entry this spring and I juried into the exhibit called "Currents". It opened August 7 at the Brush Art Gallery & Studios in Lowell, MA. It was wonderful seeing so many people there to take in the opening!


Here I am with my entry called Reunion, which was taken from a photograph of Multnoma Falls outside of Portland, OR.


And one came home...


Mariposa has been touring with "Butterfly Whirl" and the tour has finally ended. She is back home. I decided that life is too short not to enjoy every minute, so I hung the girls in my bedroom. I say "good night" to them each night with a chuckle under my breath. 

Next post you will be seeing some of Apollo...


Wednesday, August 31, 2016

Building a Nest

I knew when I drew it that Lady Feather's nest would be perfect for discharge dyeing. So for those of you who are new to the art quilt world, discharge dyeing is using a chemical to remove color from already dyed fabric, leaving wherever you apply it white or close to white, without using the more destructive bleach.


My first task was in finding the perfect fabric. I chose a hand dyed rust fabric with some ombre color change from one side to the other. I bought a fresh bottle of deColourant, now made by Jacquard Products, and found a perfect sized brush.  

This product is reasonably toxic when in the gaseous state and also not the best to have on your skin. I was careful to use tight latex gloves and a respirator. I also brought my ironing board out to the deck so I didn't poison my kitties.


After making sure the fabric would give me the right look with a couple of samples, I painted on all of the twigs and grasses by using my light box and the drawing. As you apply it the areas appear wet but that is the only indicator that you have painted your design. Color does not come out until you hit it with the strong heat of an iron. You need to be methodical in your application of product. The fluid needs to dry after applying before the next step, so I set it in front of my studio fan and waited impatiently. A watched pot never boils!


Finally it was dry enough for the next step, which is applying heat with a dry iron until the design areas show with the desired degree of contrast. I used a press cloth below and above so neither my board or my iron was in direct contact with the chemical. You can actually see the smoke lifting off the fabric as it works.


Set up and ready to iron.


What it looks like as it is burning out the color.


I actually marked my press cloth with a marker so it never gets used for anything else.


What it looked like after the first application and ironing.

No matter how careful I thought I was at working methodically through the design, I missed spots. So I went back and re-applied to those areas and I defined other areas. After drying I ironed it off again. I actually ended up doing this one more time before feeling satisfied that it was the way I wanted it


I painted for the second time over the light box and my cartoon. Even with the light box it was hard to see because the color of the fabric was so dark.


Complete!

Phew, finally I got to take off the respirator and get some fresh air!

The final step to making the fabric set and to stop the discharging process is to thoroughly wash the fabric with a strong detergent for laundering clothes. Synthrapol is often suggested as the best option, but not having any I just used my laundry detergent and scrubbed and rinsed a few times. If I were doing a large area with discharge, I would definitely invest in a bottle of Synthrapol, but as I am not a dyer I might not have any other use for it in my studio.


I may have been a bit free with the brushwork so after it dried I went back over the whole piece with a matching fabric marker and defined the lines. I love using Tsukineko Fabrico Markers to help define and refine areas on my fabrics. They worked wonderful here to really refine the brushwork. The nest was finally completed and ready to add fusible web to the back. 


I cut the outer edges close to the design and set it on top to see how it looked. 


I moved on to work other areas of Lady Feather which needed to be completed before the nest. Finally I got to set it onto the quilt with stitchwork. I decided to stitch crazy wild stitching in the negative areas around the twigs so that they would pop a bit and I accentuated that with an extra piece of batting beneath the nest. I used three colors of rayon thread, gold, rust and brown to give some shading and roundness to the nest. The best part of the stitching is looking on the back to see the saturation of the stitches. 

While it was a lot of work, I think it really helped to define the complexity of the twigs better than any other technique might have. Ultimately, I am pleased with how it came out and will not hesitate to use deColourant again for any other similar project.

In my next post I will reveal the completed piece and talk about the nervous energy of entering Quilt National for the first time.

Thursday, July 28, 2016

Process - Lady Feather

Despite the heat, I have been working (and sweating) on Lady Feather. I have been taking my time getting things right. I am about to begin the stitching on her body and I just got a brand new bottle of deColourant for using on her nest. I may work on that Friday out on the deck with my respirator, which is oh so much fun to use on a hot day. I will walk you through what has happened the past few weeks.


My first step to creating her was to prepare a piece of lightweight muslin by backing it with Wonder Under 805, leaving the paper backing in place. I then traced the outline of Lady Feather onto the muslin top with a peach Fabrico fabric marker.


I started the long and drawn out process of selecting the fabrics. No matter how much I plan to have just the right ones to pull from, I end up looking for something else through my stash and my baskets of prepared scraps. Here I am cutting out her face and neck from a base fabric of pinks, whites and golds with a touch of lavender thrown in for good measure.


The photo makes it look a bit more orange than it is. Here is the piece I finally cut and ironed down onto the muslin. Then I worked to create some shadows on her face. I use my markers carefully to direct where the eyes, nose and mouth will go.


This is my first attempt at getting the shadows on her face. I ended up changing color on her lips and recutting the shadow on the right side of her cheek. All of this takes hours and even days to cut, place, and recut over and over. Sometimes I just have to live with some colors a day or two before deciding whether to keep them or change them.


I filled in the eyes, changed the mouth color, which really needs much more definition from stitching, defined the shadows going from her neck through her left arm and laid down broad areas of color for the upper arms. I have wanted to use the feather batik since I first came up with this idea for a "bird lady." Above it became the base of her top. Sheer, blue silk organza helps to define shadow on the top and I laid down a few feathers to give an idea of how it will all come together visually.


The feathers will get tacked on after the body has it's quilting stitches done with one variable width satin rib down the middle of each feather as it connects to the leather strap necklace which will be couched onto her neck. 


She is a blond. Her hair will peek from beneath her nest. Here I have included a piece of tissue outlined in pencil showing where her owl mask will cover her face.


The forearms and hands have been completed. The left arm will settle down with stitching onto the background. But the right arm will have to wait until all the other pieces, including feathers, mask and a bird are sewn in and it will get set in on top with a bit of extra padding.

My next post will continue the process with a glimpse of how the stitching is coming on her body and my process of using discharge on the nest, complete with a respirator selfie. True to my word, the butterfly quilt (Apollo) background has begun on my other summer piece. But I am keeping that one under wraps for now. There is just not enough time in a day!

Saturday, June 25, 2016

Dog Days

Here we are again, 80 degrees and rising in the studio! While I often have much to do in the summer, it is awfully hard to work in this heat. One of these years I have to get air conditioning installed in the studio.


It's been a busy spring. After it's premier at the Fuller Craft Museum the SAQA MA/RI exhibit "Art as Quilt" opened at Highfield Hall, a mansion and museum/gallery in Falmouth, MA on Cape Cod. As curator of the show, I got to bring the work down to Falmouth, help hang it and recently take it down to bring it all home. 

This was such a successful exhibit for the SAQA artists in MA, RI and CT. Six pieces sold while at Highfield Hall, so there are six very happy artists. The opening in Falmouth was on May 1 and the place was just packed.


Our second show, "Currents" was juried in May as well and my piece, Reunion, was accepted into that exhibit which opens at the Brush Art Gallery & Studios in Lowell, MA on August 7.

right: the crowd at the opening of "Art as Quilt" and Sue Polansky and Carol Vinick in front of their work


Co-Curator, Sue Bleiweiss has been working on the exhibit catalog which will be available soon through Amazon. Twenty-five pieces by fifteen artists were juried in. I am enjoying the process of curating shows and am looking forward to planning more in the future. It really is exciting to see so many amazing works of art come together in a show. 


On the homefront, I have set goals for entering calls for 2016. My first attempt was a rejection but as I mentioned Reunion was accepted into "Currents" this summer. I have two all SAQA big shows in my sights as well as a couple of others. They are all coming due from September through the end of November. I also have targeted a couple which come up in the first months of 2017.


The first call to come up is called "Layered Voices" and the deadline is September 30. I am working on a piece with butterflies and thistle. The butterflies are the Alpine Apollo butterfly, which is the rarest butterfly on earth and a partial lacewing, white butterfly with black and red spots. Organza is providing me the lacy wings. 


The shot to the right approximates the look I am trying to achieve with the background, which is a landscape of an Alpine grassland valley. My drawing is almost finished, the fabric sandwich is ready so I should be sewing this one soon.


Lady Feather has begun as well. I like working more than one piece at a time. I started with the background, which is a fantastic piece of blue and white from Carol Eaton. So fantastic that I didn't want to waste any. So I drew on tissue an outline of where the background would go, cut it out and fused it to plain muslin. 
 

Below is the fabric background stitched with a "windy" texture. My next move is to flesh out Lady Feather herself onto a piece of muslin and then to work her nest of a "bad hair day". 


I have been making her feather necklace bit by bit. The feathers are made in relief, sewn, turned, hand pieced together and then stitched.


Above they are sewn and ready for quilting.


And then the ribs of the feather are created with quilting.

You will be seeing more of this one as I continue working it. Apollo will remain undercover for a bit as I am making it specifically for a call for entry. I may decide to give you a shot or two of the background stitching as it comes together. But the butterflies will remain a secret surprise.

My last bit of news is that I am published! I have an article in "Art Quilting Studio's" June 2016 issue. Queen Bee Says No to GMOs, Mariposa and Empress of the Pines are featured in an article I wrote called "Nature's Portraits: Tapping into Imagination." I must say I am over the moon excited. I was just in a JoAnn's shopping the other day and I looked through the magazine section and found the issue I'm in. 


Well that catches me up for a bit. I am busy, busy, busy. I have taken on so many projects at once and they all have to be done by fall and winter so I may not be writing much. So tomorrow is another day with the heat, a fan and a sewing machine.