Showing posts with label Fusing Technique. Show all posts

Thursday, July 28, 2016

Process - Lady Feather

Despite the heat, I have been working (and sweating) on Lady Feather. I have been taking my time getting things right. I am about to begin the stitching on her body and I just got a brand new bottle of deColourant for using on her nest. I may work on that Friday out on the deck with my respirator, which is oh so much fun to use on a hot day. I will walk you through what has happened the past few weeks.


My first step to creating her was to prepare a piece of lightweight muslin by backing it with Wonder Under 805, leaving the paper backing in place. I then traced the outline of Lady Feather onto the muslin top with a peach Fabrico fabric marker.


I started the long and drawn out process of selecting the fabrics. No matter how much I plan to have just the right ones to pull from, I end up looking for something else through my stash and my baskets of prepared scraps. Here I am cutting out her face and neck from a base fabric of pinks, whites and golds with a touch of lavender thrown in for good measure.


The photo makes it look a bit more orange than it is. Here is the piece I finally cut and ironed down onto the muslin. Then I worked to create some shadows on her face. I use my markers carefully to direct where the eyes, nose and mouth will go.


This is my first attempt at getting the shadows on her face. I ended up changing color on her lips and recutting the shadow on the right side of her cheek. All of this takes hours and even days to cut, place, and recut over and over. Sometimes I just have to live with some colors a day or two before deciding whether to keep them or change them.


I filled in the eyes, changed the mouth color, which really needs much more definition from stitching, defined the shadows going from her neck through her left arm and laid down broad areas of color for the upper arms. I have wanted to use the feather batik since I first came up with this idea for a "bird lady." Above it became the base of her top. Sheer, blue silk organza helps to define shadow on the top and I laid down a few feathers to give an idea of how it will all come together visually.


The feathers will get tacked on after the body has it's quilting stitches done with one variable width satin rib down the middle of each feather as it connects to the leather strap necklace which will be couched onto her neck. 


She is a blond. Her hair will peek from beneath her nest. Here I have included a piece of tissue outlined in pencil showing where her owl mask will cover her face.


The forearms and hands have been completed. The left arm will settle down with stitching onto the background. But the right arm will have to wait until all the other pieces, including feathers, mask and a bird are sewn in and it will get set in on top with a bit of extra padding.

My next post will continue the process with a glimpse of how the stitching is coming on her body and my process of using discharge on the nest, complete with a respirator selfie. True to my word, the butterfly quilt (Apollo) background has begun on my other summer piece. But I am keeping that one under wraps for now. There is just not enough time in a day!

Friday, June 19, 2015

My Baby Is Live Online

I am very excited to announce the birth of my new baby. I now have a new website and you can view it at: www.nancyturbitt.com. I also have a new email address linked to it. You can still reach me at the old one but the new address is nancy@nancyturbitt.com. 

I am burning the night oil in the studio with two pieces that I really can't show here as they are being made for calls for entry. So I'll show you what I can.


On June 6, I was invited to attend an Etsy Seller's Event in RI so I decided to try it out. It was held in the mill complex next to RYCO in Lincoln. It took me a few days to prepare, however it was good experience. I was one of only a few vendors inside the mill, while other vendors were outside with tents. I actually sold a small piece and some fabric and trim too. It was a profitable day for me and lots of people got to see my work hanging all around me. 


Not a bad set up for throwing it together quickly! My Mom's old drying rack was a great way to display my fabrics.


While there, I had prepared a demo for a small piece. I had a lot of interest in what I was doing and I got a great start on a new piece. 


Here I am cutting and fusing petals onto a piece of muslin with the outline of the lily already drawn in fabric markers.
I've been working on this a bit at home. After fusing the lilies into place, I have been sewing them down. Almost done with the stitching. Then I'll add my border, cut and bind and it will be done.

I really do love lilies!


Art As Quilt, the SAQA MA/RI Regional exhibition for 2015, has been juried and selected. During the month of May it was decided that the MA/RI Reps would not be jurying the show and another juror was selected last minute. My sole entry, did not get selected. I have not seen the selections yet, but I am sure that this is a fantastic show. I will be working with Sarah Aubry to get an exhibition catalog done in time for the opening in October. I'll be talking more about this exciting show as we get closer to the opening. Congrats to all who made it in!

My work is now a part of my Etsy shop. My shop was primarily started as an outlet for my remnant fabrics and sewing sundries that I don't use. Called Zipper Tailor Fabric Snap, I originally had no intent to add my artwork into the mix. Not wanting to create a separate shop just for art, I finally decided to feature some of my pieces in the shop. My views increased quickly and have kept up. Below are my small pieces, matted and framed. The first, Medusa Awakens, has sold. 


They do look nice in frames! 

Check out my Etsy shop www.etsy.com/shop/ZprTlrFbrcSnp


Tomorrow will be another long day in the studio. I wouldn't have it any other way!


Monday, November 3, 2014

Studio Days


Busy days in the studio. The new wolf has been stitched in part to the background. He has extra loft behind him and it is making him seem more real. You can see some shadows above his eyes. He'll be done soon so I moved onto the next step.


Here, Peter is being fleshed out onto a piece of muslin. All the pieces are fused to the muslin. The excess gets cut away and he settles into the tree. The rope eases down from his hand to catch the wolf's tail. The little bird is flying about the wolf's nose. The leaves on the tree are the last to go on. You'll be seeing more of the process and the completed pictures soon.


Monument was started in 2013 to go with the three other Santa Fe pieces I did at that time. This piece did not fit well into the "Three Cohesive Pieces" theme of the exhibition I was preparing for so I set it aside. However, I really love this piece. I have done a bit more drawing on it with my fabric markers to delineate the stones in the intersecting walls. My new Sweet 16 will help me make short work of the stitching.

More updated pictures coming.

Wednesday, September 18, 2013

Progress on Queen Bee


"Queen Bee" has been on my worktable and work board all through this summer. I have the intention of entering her into a call for entry in January. PAQA-South, (Professional Art Quilters Alliance-South) has an exhibition call coming up called Art Quilts whimsy, April 23 - June 22, 2014, Page-Walker Arts & History Center, Cary, NC. Even though I take "Queen Bee" pretty seriously, she fits the definition of 'whimsy' quite easily. So here I am pushing to get another quilt done for a deadline. I really am my own worst enemy!


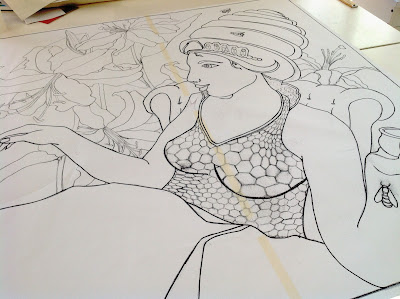
So progress? The first thing I did was blow her up to size. She should finish out with her border at exactly 60" x 60". I want her square and cannot exceed 60". We'll see what happens when I get to the border. After blowing her up, I redrew areas that needed tweaking with a sharpie marker.


I decided to do things a bit differently with this piece so the first thing I started on was the lilies. I drew them with fabric markers onto fusible backed muslin, paper still attached and fused my colored petals onto the muslin. 


This will allow me the opportunity to adjust things a tad on the board by moving each of the flowers where I wish them to land. As I satin stitch the flowers onto the background all the raw edges will be covered. I cut each flower carefully down around the edges. Now I can move the whole flower around.


There are two groups of lilies in the quilt, a red-orange and a yellow-orange. Here is a look at the yellow-orange one. I moved on to doing her bee skep hair which has a primary fabric of a honeycomb. Below you can see how her beehive came to life.


Sometimes things just drop into your lap. The three shots of hand-dyes are all from the same piece of intense and exquisite hand-dyed cotton. 

When I was in Lowell for the Quilt Festival, I spent my last half hour looking quickly at the vendors. Some buttons to my left caught my eye and as I passed a booth to get to the buttons this piece stopped me in my tracks. 

Without hesitation, or even knowing it's price, I grabbed hold of it and bought it on the spot. It is perfect! I would like to mention that it comes from a dyer in Florida, Gabriele Bullard. Her pieces were amazing and I am trying to get another piece as we speak. Her website is not up yet but she gave me her card with her email, fabrilish@gmail.com. If you don't dye your own and you need something spectacular, I highly recommend getting in touch with her. As difficult as you can imagine it was for me to cut this piece, it had to be cut and has become Bee's gorgeous skin.


The first piece I cut was the most important. Her face and neck had to be from just the right area with a mix of pink, peach and yellow.

Here you can see that I defined her neck with some of the lavender areas of the same fabric. The addition of her aqua eye brings her to life. 

Add to that her already created beehive and my black and white drawing is beginning to pop off the paper.


I continued creating her skin areas, her arms and hands. You can begin to see what I mean when I said that this fabric was perfect. I added shadow areas to both arms and the hands to help give them dimension.

I had chosen a print for the background and a batik for her dress and had it all in place with the edges basted and on my workwall for quite a while. After living with it for a while, I realized that I hated it. So I went to my silk cache and chose 5 beauties to become my background. I drew a swirly background on my cartoon with a colored marker and started in. All my silks are kept folded in my large armoire. Getting the folds to come out is brutal. They really should be kept on a roll, but I just don't have the space.


I created pattern pieces with tissue so that I could butt each shade up to one another. They were backed with fusible and ironed to the deep blue shantung which I had the most of.

You can see how invaluable Super Mario is to the whole process. I wanted some difference and movement so there are 5 shades of blue and green making up the background.


Having the background ironed in place, I pinned it to my workboard and started pinning each of the fabric colored muslin pieces in place. Bee's eye pops even more with the teal background next to her.

You can see that the dress pieces are missing from the mix. I am currently working on redrawing the honeycomb on Bee's bodice. Not easy making honeycomb move with the curvature of her body. Once I get the drawing right, I will use my window light box idea to draw it out on my choice of fabric with fabric markers.


You can see in this one how the more violet areas of the fabric were used to provide shadow in the arm. Her honey pot and the honey are next.


I worked for a long time trying to get the right amount of fluid movement in her hand. She will be supporting a bee with her index finger. Bees, of course, go on last.

And here is the placement, so far, of the lilies around her face. Stems and leaves will slide under them, creating the look of a garden.
So that is where I left off with the Queen. Just a few more key areas to design, and cut and then I can iron the finished composition into place and start sewing everything into place. I see a solid two months work left here.

But then I realized that the counterpart to "Queen Bee", "Mariposa" the butterfly princess, has a perfect outlet for a call for entry in Texas.  Butterflies and Their Beautiful Kin is an upcoming exhibition at the Texas Quilt Museum with a deadline to enter of November 15, 2013 (which is coming up rather fast - "can she do it?", you say). The exhibition will premier in June of 2014 and travel until 2017. If I want to enter this I need to move my butt. So I started my redraw of "Mariposa" last night.


Far from complete, "Mariposa" has a large neck ruffle made of butterfly wings. More of a portrait than "Queen Bee", there will not be as much going on in the background. Her hair has, of course, remained styled into a chrysalis.

Her eyes are now open and intent on the butterflies that will be flying around her left hand. This piece will come in at 40" or above and will be square as well as "Queen Bee".


Well, I best stop fooling around with this computer and get to work! You will be seeing next how Bee's dress is shaping up and how Mariposa is beginning.